Introduction
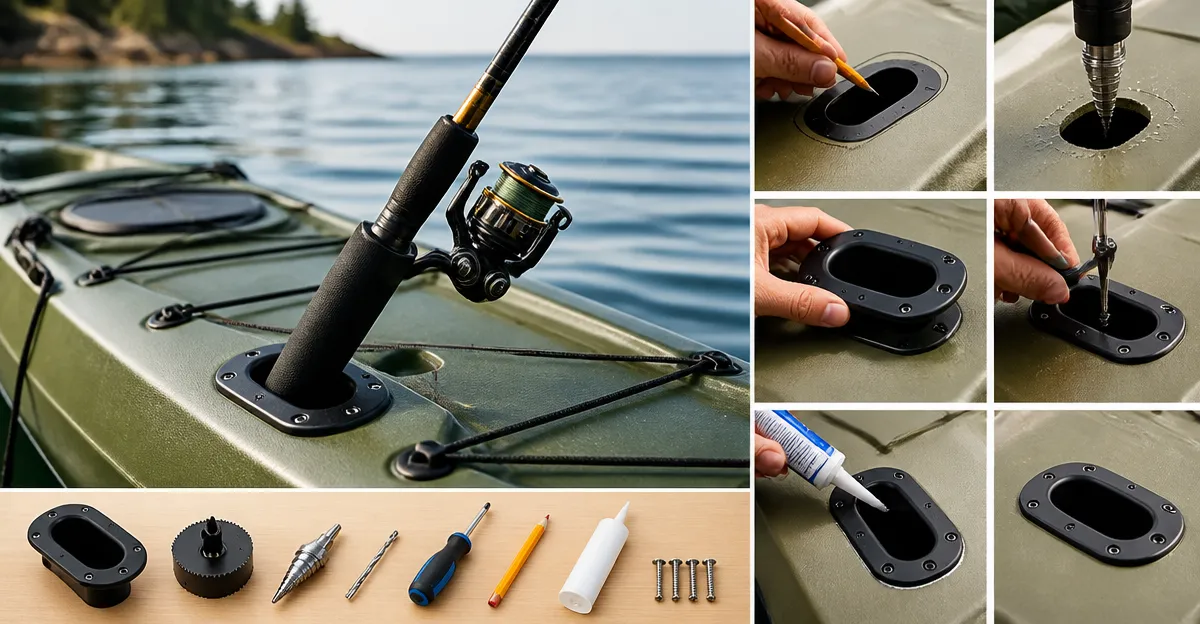
One of the most rewarding upgrades for a kayak fisherman is the addition of a flush‑mount rod holder. By securing a rod in a low‑profile mount, the angler frees both hands for paddling, navigation, and gear handling while maintaining a stable casting platform. This guide explains how to install a flush‑mount rod holder on a typical kayak, outlines the tools required, and highlights product selections that simplify each stage of the process. The reader will emerge with a reliable, weather‑resistant mounting solution that enhances safety and improves catch rates during extended outings.
What You'll Need
- Drill with appropriate bit set (typically 3/16" for pilot holes)
- Stainless‑steel screws or bolts supplied with the chosen rod holder
- Measuring tape and a fine‑point marker
- Marine‑grade sealant (optional but recommended for long‑term durability)
- One of the following rod‑holder kits, selected for compatibility with the kayak's deck configuration:
- HiUmi Kayak Track Rod Holder – 2‑pack, $27.50, 4.4/5 rating (266 reviews)
- Borogo Kayak Flush Mount Rod Holders – 2‑pack, $9.99, 4.7/5 rating (1,421 reviews)
- Huntury Kayak Track Rod Holder – single unit, $27.99, 4.7/5 rating (30 reviews)
- Anndason Kayak Flush Mount Rod Holders – 2‑pack, $9.99, 4.6/5 rating (1,723 reviews)
- Huntury Kayak Track Rod Holder (Budget) – single unit, $17.99, 4.7/5 rating (30 reviews)
Step 1: Assess the Deck Layout and Choose the Mount Type
The first decision concerns whether the kayak already possesses a track system or requires a flush‑mount installation. If the vessel includes a pre‑installed T‑track, a track‑compatible holder such as the HiUmi Kayak Track Rod Holder or the Huntury Kayak Track Rod Holder will slide directly into the groove, eliminating the need for drilling. For kayaks lacking a track, a flush‑mount model such as the Borogo Kayak Flush Mount Rod Holders or the Anndason Kayak Flush Mount Rod Holders provides a low‑profile cradle that bolts directly to the deck. The selection should reflect the angler's existing hardware, budget, and preferred rod configuration.
Step 2: Measure and Mark the Ideal Placement
Optimal positioning balances accessibility with boat balance. Measure a distance of approximately 12‑18 inches forward of the cockpit seat, aligning the holder with the natural line of the paddler's arm. Use a fine‑point marker to indicate the screw‑hole locations, ensuring that the marks are symmetrical on both sides if a dual‑holder setup is desired. The Borogo and Anndason kits specify three fixing points that create a 30‑degree angled head; marking these points precisely will guarantee smooth rod adjustment later. Accurate marking prevents misalignment, which can cause water ingress or reduced structural integrity.
Step 3: Drill Pilot Holes Using the Correct Bit Size
After confirming the markings, select a drill bit that matches the diameter of the supplied screws—typically 3/16 inch for stainless‑steel fasteners. Drill pilot holes at a low speed to avoid cracking the composite deck material. If the kayak is constructed of fiberglass or polyethylene, applying a few drops of marine‑grade sealant into each hole before inserting the screw will create a watertight seal. The Huntury Kayak Track Rod Holder (Budget) includes a twist‑to‑lock adapter that requires only a single mounting hole, reducing the drilling workload.
Step 4: Install the Flush‑Mount Bracket
Place the bracket over the pilot holes and align the screw slots with the drilled openings. Using a Phillips‑head screwdriver, tighten each screw until the bracket sits flush against the deck without any gap. The Borogo and Anndason models feature a 30‑degree angled head that facilitates quick rod adjustment; ensure the angle faces upward to allow the rod to rest naturally. For track‑compatible holders, slide the base into the existing T‑track and secure it with the provided T‑shaped screw mounting base. The HiUmi and Huntury track holders benefit from a one‑piece twist‑to‑lock adapter that locks securely with a simple twist, eliminating the need for nut‑tightening.
Step 5: Attach the Rod Cradle and Test Adjustability
With the bracket firmly mounted, slide the rod cradle into place. The cradle should cradle the rod shaft without excessive pressure, allowing the reel to rotate freely. Adjust the tilt and rotation using the built‑in 360‑degree horizontal swivel and 270‑degree vertical tilt found on the Huntury track holders. For flush‑mount models, rotate the 30‑degree head to achieve the desired casting angle. Verify that the rubber strap or integrated clamp holds the rod securely when a simulated strike is applied. This step confirms that the installation meets functional requirements before heading out on the water.
Step 6: Apply Sealant and Perform a Final Inspection
To protect the mounting points from corrosion, apply a thin bead of marine‑grade sealant around each screw head and along the bracket edges. Allow the sealant to cure according to the manufacturer's instructions, typically 24 hours. Conduct a final visual inspection, checking for any loose hardware, misaligned brackets, or excess sealant that could interfere with paddle movement. Once satisfied, the kayak is ready for a hands‑free fishing session.
Tips & Pro Tips
- When drilling, wear eye protection and secure the kayak on a stable workbench to prevent movement.
- Use stainless‑steel screws rather than carbon‑steel to resist rust in brackish water.
- If the kayak is used in cold climates, consider a silicone‑based sealant that remains flexible at low temperatures.
- For anglers who frequently switch between spinning and fly rods, the Huntury track holder's open cradle and adjustable tilt provide superior versatility.
- Store spare screws and a small wrench in a waterproof tackle box for on‑the‑water adjustments.
Troubleshooting
Problem: The rod holder wobbles after installation.
Solution: Verify that all screws are tightened to the recommended torque (typically 1.5‑2.0 Nm). If wobble persists, re‑drill the pilot holes slightly larger and use a washer to distribute load.
Problem: Water leaks around the mounting area.
Solution: Apply additional marine sealant around each screw and allow it to cure fully before exposure to water.
Problem: The rod cannot be tilted to the desired angle.
Solution: Ensure that the bracket is not obstructed by deck fittings or accessories. For track holders, confirm that the twist‑to‑lock adapter is fully engaged.
Conclusion
By following the outlined steps, the angler can install a flush‑mount rod holder that provides a stable, low‑profile platform for a variety of fishing techniques. The guide emphasizes careful measurement, proper drilling, and the use of marine‑grade hardware to ensure longevity. Whether the kayak already includes a T‑track or requires a dedicated flush‑mount bracket, the recommended products deliver reliable performance at competitive prices. With the installation complete, the fisherman can enjoy hands‑free casting, improved balance, and increased catch potential on every outing.
Products Mentioned in This Guide
Frequently Asked Questions
What size drill bit should I use for the pilot holes when installing a flush‑mount rod holder?
Use a 3/16" drill bit for the pilot holes unless the manufacturer specifies a different size.
Do I need marine‑grade sealant on the screws for a flush‑mount rod holder?
Sealant is optional but recommended to prevent water intrusion and improve long‑term durability.
Can I install a flush‑mount rod holder on any kayak deck?
The holder must be compatible with your kayak’s deck layout; most kits list the compatible deck configurations in the product description.
What are the benefits of a flush‑mount rod holder for kayak fishing?
It provides a low‑profile, stable casting platform while keeping your hands free for paddling and gear handling.
Are stainless‑steel screws or bolts necessary for the installation?
Yes, stainless‑steel fasteners are required to resist corrosion in a marine environment.