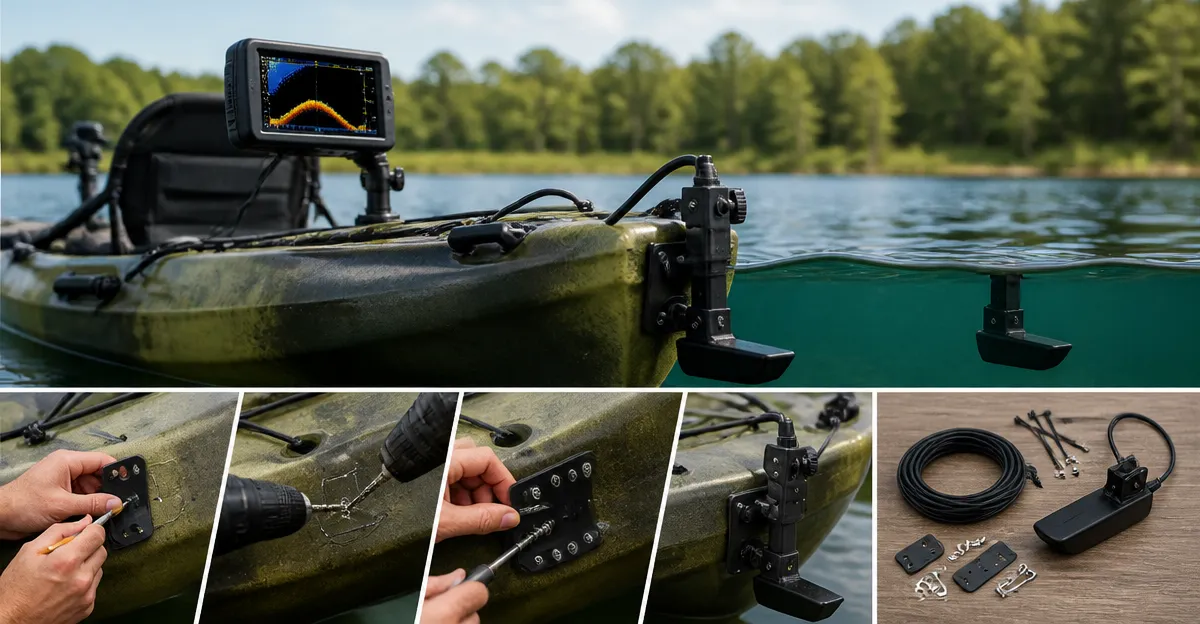
Introduction
The reader will learn how to install a fish finder transducer on a kayak in a safe and reliable manner. Understanding the installation process will enable one to locate fish more effectively while paddling. The guide provides practical instructions, product recommendations, and professional advice. By following the steps, the reader will achieve a durable mounting solution that enhances the fishing experience.
What You'll Need
- Compatible transducer (e.g., Garmin GT20‑TM Transducer)
- Fishfinder unit (e.g., Garmin Striker 4 Fishfinder)
- Mounting hardware such as brackets, screws, and marine sealant
- Drill with appropriate bits, screwdriver set, and measuring tape
- Water‑proof connectors and zip ties for cable management
- Protective gloves and eye protection
Step 1: Choose a Compatible Transducer and Fishfinder
The first decision involves selecting a transducer that matches the chosen fishfinder. The Garmin GT20‑TM Transducer offers a 500 W power rating, depth capability of 1,900 ft (traditional) and 750 ft (ClearVü), and includes both transom and trolling‑motor mounts. It is priced at $96.13 and holds a 4.6‑star rating from 250 reviews, indicating reliable performance.
For anglers who prefer an alternative, the Humminbird XNT‑9 Transducer provides dual‑spectrum CHIRP 2D sonar with a 150‑220 kHz range and a maximum depth of 1,200 ft. Priced at $86.50 and rated 4.7 stars from 487 reviews, it is a cost‑effective option for kayaks.
The Lowrance SplitShot Skimmer Transducer supplies both DownScan and CHIRP views, offering double the sonar coverage of traditional units. At $85.99 with a 4.6‑star rating from 545 reviews, it is well suited for kayakers who desire versatile imaging.
Pair the transducer with a fishfinder that supports the selected sonar technology. The Garmin Striker 4 Fishfinder features ClearVu scanning sonar, CHIRP technology, and a 3.5‑inch display. It costs $130.99 and enjoys a 4.6‑star rating from 9,299 reviews, making it a popular choice for small vessels.
For users who desire a color display, the Garmin Striker Vivid 4cv Fishfinder provides vivid color palettes, a 4‑inch LCD, and built‑in Quickdraw Contours mapping. Priced at $199.99 with a 4.7‑star rating from 1,806 reviews, it delivers enhanced visual clarity for identifying fish structures.
Step 2: Determine the Optimal Mount Location on the Kayak
Selecting the correct location ensures accurate sonar readings and protects the transducer from damage. The transducer should be mounted on the hull where it has an unobstructed view of the water below, typically near the stern or on a transom‑style mount if the kayak possesses a small rear platform.
Measure the distance from the transom to the desired mounting point, ensuring the cable length of the chosen transducer can reach the fishfinder without tension. The Garmin GT20‑TM includes a 20‑foot cable, which is sufficient for most kayak configurations.
Avoid mounting near the kayak’s gunwales or in areas where the hull flexes excessively, as this can cause signal distortion. Use a level to confirm that the transducer will sit parallel to the water surface when the kayak is in motion.
Mark the selected spot with a waterproof marker, and double‑check the placement by submerging the transducer briefly to verify that the sonar returns are clear and consistent.
Step 3: Prepare the Transducer and Mounting Hardware
Before drilling, clean the hull area with a mild detergent and rinse thoroughly to remove any residues that could interfere with the sealant. Dry the surface completely to ensure optimal adhesion of marine‑grade sealant.
If the transducer requires a custom hole, use a drill bit that matches the diameter of the transducer’s mounting flange. For the Garmin GT20‑TM, a 1‑inch hole is recommended to accommodate the built‑in mounting bracket.
Apply a thin layer of marine‑grade silicone sealant around the drilled opening to create a watertight barrier. Insert the transducer’s mounting bracket, ensuring that it sits flush against the hull and that the sealant fills any gaps.
Secure the bracket with stainless‑steel screws provided in the transducer package. Tighten the screws evenly to prevent warping of the hull material, and wipe away excess sealant with a clean cloth.
Step 4: Install the Transducer and Route the Cable
Slide the transducer through the prepared opening until the mounting flange rests against the hull interior. Verify that the transducer faces directly downward, as an angled orientation can degrade sonar performance.
Route the cable along the interior of the kayak, using zip ties to keep it away from moving parts such as foot straps or paddle holders. Ensure the cable does not create a tripping hazard for the paddler.
Seal the cable entry point with additional silicone sealant to prevent water ingress. Allow the sealant to cure for at least 24 hours before proceeding to the next step.
Connect the transducer cable to the fishfinder’s sonar input port. For the Garmin Striker 4, the connection is a simple plug‑and‑play interface, while the Striker Vivid 4cv utilizes the same GT20‑TM connector for seamless integration.
Step 5: Power Up, Calibrate, and Test the System
Install the fishfinder in a waterproof housing or mount it on the kayak’s dashboard using the supplied bracket. Secure the power source, typically a 12‑volt battery pack, ensuring that the battery is rated for marine use.
Power on the fishfinder and navigate to the sonar settings menu. Select the appropriate frequency (traditional or CHIRP) based on the water conditions; CHIRP provides superior target separation in shallow water, while traditional sonar may be preferable in deep water.
Perform a calibration run by paddling slowly in calm water. Observe the depth readings and fish arches on the display. Adjust the transducer angle if the sonar image appears distorted or if dead zones appear on the screen.
Record a waypoint for the launch location using the fishfinder’s GPS feature. This will allow the angler to return to the same spot on future outings, maximizing the value of the investment.
Tips & Pro Tips
- Use a waterproof marine sealant that remains flexible after curing to accommodate hull flex.
- When mounting on a fiberglass kayak, pre‑drill a pilot hole to avoid cracking the hull.
- Consider adding a small foam padding between the transducer and hull to dampen vibrations caused by paddling.
- Run a short test in a shallow lake before venturing into deeper water to verify that the transducer is properly aligned.
- Store the cable and connectors in a dry pouch when not in use to extend their lifespan.
Troubleshooting
No Signal or Weak Signal: Verify that the transducer cable is fully seated in the fishfinder port. Check the sealant for any gaps that might allow water to enter the connector.
Excessive Noise or Interference: Ensure that the cable is routed away from power cables or electronic devices that could generate electromagnetic interference.
Inaccurate Depth Readings: Re‑measure the mounting angle and confirm that the transducer is perpendicular to the water surface. Adjust the frequency setting if the water is particularly turbid.
Conclusion
The guide has demonstrated how to select appropriate equipment, determine a proper mounting location, prepare the hull, install the transducer, and verify system performance. By following each step, the kayaker will achieve a reliable sonar solution that enhances fish detection and navigation. Readers are encouraged to apply the pro tips and troubleshooting advice to maintain optimal operation throughout the fishing season.
Products Mentioned in This Guide
Frequently Asked Questions
What type of transducer is best suited for a kayak?
A shallow‑water, cone‑shaped transducer like the Garmin GT20‑TM works well because it fits the thin hull and provides clear imaging in low depths.
How can I securely mount a fish finder transducer on a kayak hull?
Drill pilot holes, attach the mounting bracket with stainless‑steel screws, apply marine sealant around the screws, and tighten the bracket to the hull for a watertight, vibration‑free fit.
Is marine sealant necessary when installing the transducer?
Yes, sealant prevents water ingress around the mounting bolts and protects the hull from corrosion.
Can I use the same mounting hardware for different fishfinder brands?
Most kayak transducers use standard 1/4‑inch or 3/8‑inch mounting holes, so generic brackets and screws typically work across brands, but verify the transducer’s mounting pattern.
How do I protect the transducer cables from water damage?
Route cables through waterproof connectors, seal any entry points with silicone, and secure them with zip ties to keep moisture out and reduce wear.
Frequently Asked Questions
What should I know about kayak fish finder mount?
Use the details in this guide to decide. The sections above cover the tradeoffs, specs, and product options related to kayak fish finder mount.