How to Rig a Kayak for Multi‑Rod Fishing: Ultimate Step‑by‑Step Guide to Rod Holders, Line Management & Tackle Setup
Introduction
The modern angler often seeks the freedom of kayak fishing while still requiring the capability to handle several rods simultaneously. This guide explains how one can transform a standard fishing kayak into a multi‑rod platform that maximises stability, comfort and catch efficiency. By following each step, the angler will learn to install rod holders, organise lines, and integrate essential electronics without compromising safety. The result is a versatile setup that works on lakes, rivers and coastal waters, allowing the angler to pursue a variety of species in a single outing.
Each section includes practical advice, product recommendations and explanations of why a particular tool improves the overall rig. The guide is written for intermediate anglers who already possess basic paddling skills but desire a more professional configuration. No prior experience with advanced kayak modifications is required; the instructions are clear, actionable and supported by real‑world examples.
What You Will Need
- A stable sit‑on‑top kayak such as the Pelican Catch Mode 110 Kayak
- Two‑in‑one rod holder system like the PLUSINNO 2‑in‑1 Kayak Rod Holder
- Portable fish finder such as the LUCKY Portable Kayak Fish Finder
- Multi‑tool kit for line cuts and gear adjustments, for example the KastKing 6‑Piece Fishing Tool Kit
- Floating landing net like the PLUSINNO Floating Fishing Net
- Marine‑grade stainless steel screws, silicone gaskets, zip ties and a cordless drill
- Adjustable seat cushion or EVA pad for added comfort during long sessions
All of the recommended items are available on Amazon and have been selected for their durability, user ratings and compatibility with the kayak platform.
Step 1: Prepare the Kayak Deck for Installation
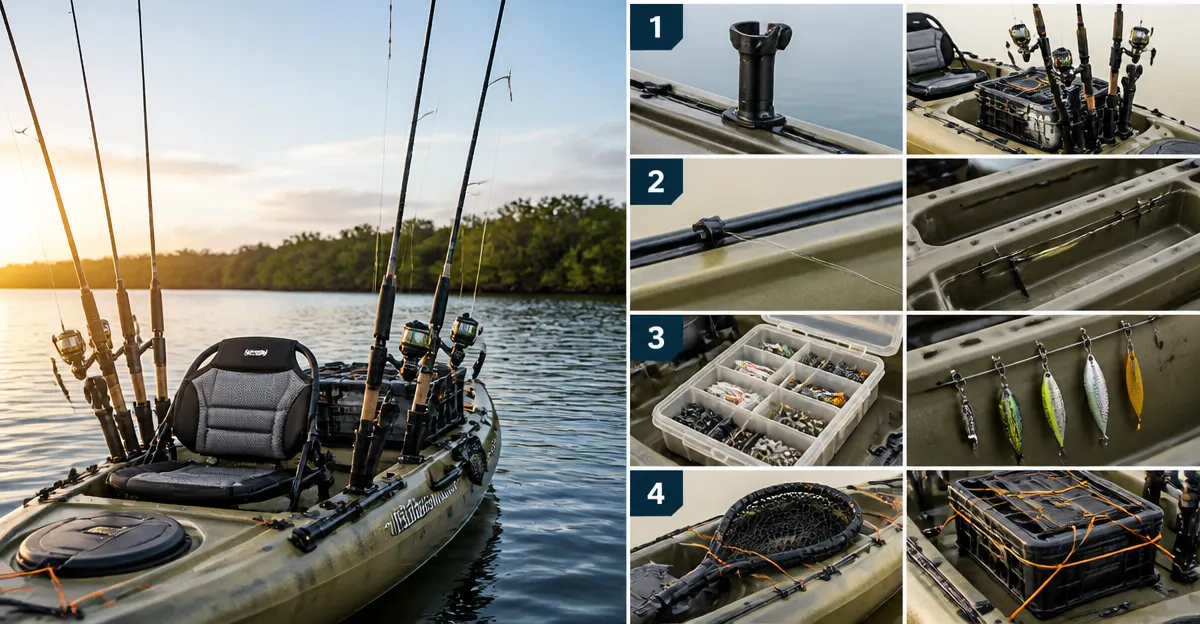
The first task is to create a clean, dry work surface on the kayak deck. One should remove any loose debris, dry the deck thoroughly and inspect the pre‑installed rigging tracks. The Pelican Catch Mode 110 Kayak includes two 4‑inch rigging tracks that are ideal mounting points for rod holders and accessories. These tracks allow the angler to slide mounting brackets without drilling into the hull, preserving structural integrity.
Using a mild soap solution and a soft cloth, one should wipe the tracks to ensure that no residue interferes with the mounting hardware. After cleaning, dry the area with a lint‑free towel. This preparation step reduces the risk of slippage when the rod holder is later secured.
Why this matters: A clean mounting surface guarantees that the silicone gaskets on the PLUSINNO 2‑in‑1 Kayak Rod Holder create a firm seal, preventing movement during vigorous casting.
Step 2: Install the 2‑in‑1 Rod Holder
Begin by positioning the rod holder on the desired rigging track. The holder offers both track‑mount and deck‑mount configurations; for most anglers the track‑mount option provides the quickest installation. Align the mounting brackets with the track slots, then slide the holder until it seats fully. Secure the brackets with the supplied stainless steel screws, tightening them with a cordless drill to a torque of approximately 5 Nm.
Next, engage the silicone gaskets on the holder’s base. These gaskets distribute pressure evenly across the deck, maximising friction while protecting the kayak’s surface from scratches. The holder’s 360° rotation and 10° fine‑adjustment knobs allow the angler to set the optimal rod angle for each fishing technique.
Product details: The PLUSINNO 2‑in‑1 Kayak Rod Holder is priced at $28.99, carries a 4.6‑star rating from 496 reviews, and is constructed from marine‑grade stainless steel. Its dual‑mount design eliminates the need for separate rail or deck holders, saving both space and cost.
Why this product is useful: The adjustable rotation enables one to position multiple rods without interference, while the quick‑release strap ensures that rods remain secure during sudden strikes.
Step 3: Mount Additional Rod Holders for Multi‑Rod Capability
For anglers who plan to use three or more rods, repeat the installation process on the second rigging track. The Pelican Catch Mode 110 Kayak provides ample deck width, allowing two rod holders to sit side by side without crowding the standing area. Space the holders approximately 12 inches apart to accommodate the width of a typical fishing rod and reel assembly.
After both holders are secured, test the rotation and lock mechanisms by gently moving each holder through its full range of motion. Ensure that each holder locks firmly at the desired angle and that the strap does not interfere with adjacent equipment.
When additional rods are needed, one may consider a lightweight telescopic pole that can be attached to the existing holder’s strap. This approach expands the rig without requiring extra mounting points.
Why this matters: Proper spacing prevents line entanglement and allows the angler to cast each rod independently, which is essential for targeting multiple species at different depths.
Step 4: Organise Line Management and Tackle Storage
Effective line management reduces clutter and improves casting accuracy. The kayak’s built‑in storage platform includes bungee cords that can hold spare reels, tackle boxes and line spools. One should route each rod’s line through a dedicated bungee loop, securing the excess line to prevent it from drifting into the water.
Install a small tackle box on the deck, preferably one with a waterproof seal. Place the KastKing 6‑Piece Fishing Tool Kit inside the box for easy access. This kit includes corrosion‑resistant pliers, a 7‑inch fillet knife, braid scissors, a floating fish‑lip gripper and a tool retractor, all of which are essential for quick line cuts and fish handling.
Product details: The kit retails for $25.58, holds a 4.7‑star rating from 2,427 reviews, and is constructed from S45C carbon steel with a polymer coating for saltwater durability. The inclusion of a lanyard ensures that tools remain attached to the angler’s belt or the kayak’s rail.
Why this product is useful: Having all essential tools in one compact, corrosion‑resistant package eliminates the need to search for individual items, thereby reducing downtime during a fishing session.
Step 5: Integrate the Portable Fish Finder
The next step is to add electronic assistance for locating fish and depth. The LUCKY Portable Kayak Fish Finder is a handheld sonar device that can be attached to the kayak’s transducer mount or simply tossed over the side. Secure the transducer to the hull using the supplied suction cup or strap, ensuring that it is fully immersed when the kayak is in motion.
Power the unit with fresh batteries and adjust the sensitivity to match water clarity; the device offers five sensitivity levels. The LCD display shows depth, fish arches, weed lines and bottom composition, allowing the angler to position each rod at the optimal depth.
Product details: Priced at $42.99, the fish finder carries a 4.1‑star rating from 3,235 reviews. Its portable, one‑hand design includes a neck strap for convenience, and the battery life lasts up to five hours under continuous use.
Why this product is useful: Real‑time depth and fish location data enable the angler to adjust lure depth on each rod independently, increasing the likelihood of multiple catches during a single outing.
Step 6: Set Up the Floating Landing Net
When a fish is hooked, a secure landing net is essential for safe release. The PLUSINNO Floating Fishing Net features a foam‑filled hoop that provides buoyancy, preventing the net from sinking if it is dropped. Attach the net to the kayak’s side rail using a zip tie or the built‑in handle loop.
Deploy the net by extending the telescoping pole; the rubber‑coated mesh is snag‑free, protecting the fish’s mouth and scales. The net’s lightweight aluminum handle adds only 12.5 oz to the kayak’s load, preserving overall stability.
Product details: The net costs $22.29, holds a 4.5‑star rating from 2,694 reviews, and measures 15.8 × 11.8 inches with a 16.7‑inch handle. Its floating design makes it ideal for kayak anglers who frequently fish in open water.
Why this product is useful: A floating net reduces the risk of losing the net overboard, a common issue when fishing from a small platform, and it facilitates quick, humane fish handling.
Step 7: Final Adjustments and Safety Checks
After all hardware is installed, the angler should conduct a comprehensive safety inspection. Verify that each rod holder is locked, that all screws are tightened, and that the fish finder’s transducer is secure. Check the kayak’s weight distribution; the combined load of rods, tackle, battery packs and the angler should not exceed the kayak’s 375 lb capacity.
Perform a short paddling test on calm water. Observe the kayak’s roll stability while standing and casting from each rod. If any wobble is detected, adjust the rod holder angles or reposition the tackle box to achieve better balance.
Finally, ensure that a personal flotation device (PFD) is worn at all times and that a bail‑out plan is established in case of capsizing. These precautions protect the angler and preserve the investment in equipment.
Tips & Pro Tips
- Use a lightweight EVA seat pad on the Pelican Catch Mode 110 Kayak to reduce fatigue during long days.
- Apply a small amount of marine‑grade silicone to the screw threads for a waterproof seal.
- Label each rod line with a colour‑coded marker to avoid confusion when reeling in multiple fish.
- Carry a spare set of batteries for the fish finder in a waterproof container.
- Practice quick‑release techniques with the rod holder strap while on shore to improve response time during a strike.
Troubleshooting
| Problem | Possible Cause | Solution |
|---|---|---|
| Rod holder rotates unintentionally | Locking knob not tightened | Re‑tighten the fine‑adjustment knob until the holder remains stationary. |
| Fish finder displays erratic depth readings | Transducer not fully submerged or air bubbles present | Ensure the transducer is fully immersed and wipe away any air bubbles before each use. |
| Lines become tangled on the deck | Improper line routing | Use the bungee cords to separate each line and secure excess slack. |
Conclusion
By following the seven detailed steps, the angler can convert a standard fishing kayak into a robust multi‑rod platform. The combination of a stable hull, adjustable rod holders, organised line management, a reliable fish finder and a floating net creates a comprehensive system that enhances catch rates and safety. The recommended products provide durability, ease of installation and excellent value, but the guide remains functional for anglers who prefer to use alternative gear.
One should now feel confident to embark on a multi‑rod fishing adventure, knowing that each component has been thoughtfully selected and properly installed. Continuous practice and periodic equipment checks will ensure long‑term performance and enjoyment on the water.
Products Mentioned in This Guide
Frequently Asked Questions
What basic equipment is required to convert a standard kayak into a multi‑rod fishing platform?
You need a stable sit‑on‑top kayak, rod holders, line management clips, a T‑slot deck rig, and optional electronics like a fish finder.
How do I securely install rod holders on a kayak without damaging the hull?
Use T‑slot or suction‑cup mounts that attach to the kayak’s deck rails, tightening bolts evenly to distribute pressure.
What is the best way to organize fishing lines to prevent tangles while using multiple rods?
Run lines through a dedicated line‑management system with clips or a spool, keeping each rod’s line on separate tracks.
Can I add electronics such as a fish finder to a multi‑rod kayak setup?
Yes, mount the fish finder on the kayak’s console or T‑slot rail and run power cables through waterproof grommets to keep everything tidy.
Is a multi‑rod kayak rig suitable for both freshwater and saltwater fishing?
A properly sealed and rust‑resistant setup works in both environments, but use corrosion‑proof hardware for saltwater outings.